数据库连接池

连接池原理

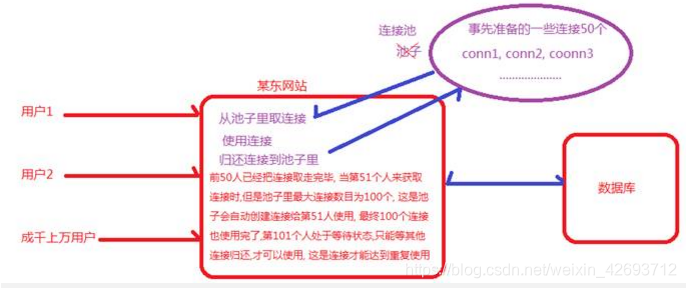
数据库连接池负责分配、管理和释放数据库连接,它的核心思想就是连接复用,通过建立一个数据库连接池,这个池中有若干个连接对象,当用户想要连接数据库,就要先从连接池中获取连接对象,然后操作数据库。一旦连接池中的连接对象被用院了,判断连接对象的个数是否已达上限,如果没有可以再创建新的连接对象,如果已达上限,用户必须处于等待状态,等待其他用户释放连接对象,直到连接池中有被释放的连接对象了,这时候等待的用户才能获取连接对象,从而操作数据库。这样就可以使连接池中的连接得到高效、安全的复用,避免了数据库连接频繁创建、关闭的开销。这项技术明显提高对数据库操作的性能。

  • 无连接池
    在这里插入图片描述

  • 有连接池

在这里插入图片描述

连接池优点

程序启动的时候就已经创建好了连接,不需用户请求的时候创建
用户关闭时不会销毁连接,需要将连接归还,就可以达到复用的效果
如果超过了使用的连接会进行上限的判断,如果没有达到最大值,可以继续创建
如果有空闲连接,会默认的进行销毁(释放)一些连接,让系统达到最优

手动实现连接池原理

1
2
3
4
5
6
7
8
9
10
11
12
13
14
15
16
17
18
19
20
21
22
23
24
25
26
27
28
29
30
31
32
33
34
35
36
37
38
39
40
41
42
43
44
45
46
47
48
49
50
51
52
53
54
55
56
57
58
59
60
61
62
63
64
65
66
67
68
69
70
71
72
73
74
75
76
77
78
79
80
81
82
83
84
85
86
87
88
89
90
91
92
93
94
95
96
97
98
99
100
101
102
103
104
105
106
107
108
109
110
111
112
113
114
115
116
117
118
119
120
121
122
123
124
125
126
127
128
129
130
131
132
133
134
135
136
137
138
手动实现连接池 (了解) 
步骤:
创建一个连接池类,需要借助于封装的jdbcUtils工具类
初始化连接数量
创建一个集合,存储多个连接对象
创建一个从池子里面获取连接的方法
创建一个向连接池里面归还连接的方法
测试
//连接池类
public class MyDataPool {

//初始化连接数量
private static int initSize = 5;

//创建一个集合, 存储多个连接对象
private static List<Connection> list = new ArrayList<Connection>();

static {
for(int i = 0; i < initSize; i++) {
//借助于JDBCUtils工具类获取连接
Connection conn = JDBCUtils.getConnection();
list.add(conn);
}
System.out.println("初始化连接的数量为: " + initSize);
}

//获取连接
public static Connection getConnFromPool() {
//从集合中取出连接
Connection connection = list.get(0);
//还要取走的连接移除
list.remove(0);
System.out.println("用户正在使用" + connection + "连接, 当前池子中剩余连接为: " + list.size());
return connection;
}

//归还连接
public static void closeAll(ResultSet rs, PreparedStatement psvm, Connection conn) {
//判断
if(rs != null) {
try {
rs.close();
} catch (SQLException e) {
// TODO Auto-generated catch block
e.printStackTrace();
}
}
if(psvm != null) {
try {
psvm.close();
} catch (SQLException e) {
// TODO Auto-generated catch block
e.printStackTrace();
}
}
if(conn != null) {
try {
//conn.close();
//归还
list.add(conn);
System.out.println("用户正在归还" + conn +"连接, 当前池子中剩余连接为:" + list.size());
} catch (Exception e) {
// TODO Auto-generated catch block
e.printStackTrace();
}
}
}


}
测试类:
package com.ujiuye.test;

import java.sql.Connection;
import java.sql.PreparedStatement;
import java.sql.ResultSet;
import java.sql.SQLException;

import com.ujiuye.pool.MyDataPool;

public class myDataPoolTest {
public static void main(String[] args) throws Exception {
//直接获取连接
Connection conn = MyDataPool.getConnFromPool();
//归还连接
MyDataPool.closeAll(null, null, conn);
System.out.println("==========================");
Connection conn1 = MyDataPool.getConnFromPool();
String sql = "select * from user where uid = ?";
PreparedStatement psvm = conn1.prepareStatement(sql);
//设置参数
psvm.setInt(1, 1);
//执行
ResultSet rs = psvm.executeQuery();
while(rs.next()) {
int uid = rs.getInt("uid");
String username = rs.getString("username");
String password = rs.getString("password");
System.out.println(uid + "\t" + username + "\t" + password);
}
//归还
MyDataPool.closeAll(rs, psvm, conn1);
}
}

DBCP连接池

DBCP也是一个开源的连接池,直接进行使用步骤介绍

  1. 导包 commons-dbcp-1.4.jar和commons-pool-1.5.6.jar
  2. 编写数据库连接的配置文件
    配置文件名称:*.properties
    配置文件位置:建议放在src下
    需求:测试连接池查询商品的名字。
    配置文件dbcpconfig.properties
1
2
3
4
5
6
7
8
9
10
11
12
13
14
15
16
17
18
19
20
21
22
23
24
25
26
27
28
29
30
31
32
#连接设置
driverClassName=com.mysql.jdbc.Driver
url=jdbc:mysql://localhost:3306/day09_jdbc
username=root
password=123456

#<!-- 初始化连接 -->
initialSize=10

#最大连接数量
maxActive=50

#<!-- 最大空闲连接 -->
maxIdle=20

#<!-- 最小空闲连接 -->
minIdle=5

#<!-- 超时等待时间以毫秒为单位 6000毫秒/1000等于60秒 -->
maxWait=60000


#JDBC驱动建立连接时附带的连接属性属性的格式必须为这样:[属性名=property;]
#注意:"user" 与 "password" 两个属性会被明确地传递,因此这里不需要包含他们。
connectionProperties=useUnicode=true;characterEncoding=gbk

#指定由连接池所创建的连接的自动提交(auto-commit)状态。
defaultAutoCommit=true

#driver default 指定由连接池所创建的连接的事务级别(TransactionIsolation)。
#可用值为下列之一:(详情可见javadoc。)NONE,READ_UNCOMMITTED, READ_COMMITTED, REPEATABLE_READ, SERIALIZABLE
defaultTransactionIsolation=READ_UNCOMMITTED

方式一:

1
2
3
4
5
6
7
8
9
10
11
12
13
14
15
16
17
18
19
20
21
22
23
24
25
26
27
28
29
30
public class DBCPDemo {
public static void main(String[] args) throws Exception {
//创建properties文件对象
Properties properties = new Properties();
//通过流的方式获取properties文件
FileReader reader = new FileReader("src/dbcpconfig.properties");
//加载properties文件
properties.load(reader);
//创建数据源
DataSource datasource = BasicDataSourceFactory.createDataSource(properties);
// System.out.println(datasource);
//通过数据源获取连接
Connection conn = datasource.getConnection();

//执行sql进行预编译
PreparedStatement psvm = conn.prepareStatement("select * from product");
//执行
ResultSet rs = psvm.executeQuery();
while(rs.next()) {
int pid = rs.getInt("pid");
String pname = rs.getString("pname");
double price = rs.getDouble("price");
System.out.println(pid+pname+price);
}
//释放资源
rs.close();
psvm.close();
conn.close();
}
}

方式二:

1
2
3
4
5
6
7
8
9
10
11
12
13
14
15
16
17
18
19
20
21
22
23
24
25
26
27
28
29
30
31
public class DBCPDemo2 {
public static void main(String[] args) throws Exception {
//创建properties文件对象
Properties properties = new Properties();
//通过流的方式获取properties文件
// DBCPDemo2.class.getClassLoader() 获取当前类的类加载
InputStream inputStream = DBCPDemo2.class.getClassLoader().getResourceAsStream("dbcpconfig.properties");
//加载properties文件
properties.load(inputStream);
//创建数据源 数据源工厂 创建数据源 从properties里面获取
DataSource datasource = BasicDataSourceFactory.createDataSource(properties);
// System.out.println(datasource);
//通过数据源获取连接
Connection conn = datasource.getConnection();

//执行sql进行预编译
PreparedStatement psvm = conn.prepareStatement("select * from product");
//执行
ResultSet rs = psvm.executeQuery();
while(rs.next()) {
int pid = rs.getInt("pid");
String pname = rs.getString("pname");
double price = rs.getDouble("price");
System.out.println(pid+pname+price);
}
//释放资源
rs.close();
psvm.close();
conn.close();
}
}

在这里插入图片描述

C3P0连接池

  1. 导包 c3p0-0.9.1.2和mchange-commons-java-0.2.3.4
  2. 倒入配置文件,放在src下(在使用c3p0连接获取数据源时,会自动读取配置文件,无需读取操作)

c3p0-config.xml

1
2
3
4
5
6
7
8
9
10
11
12
13
14
15
16
17
18
19
20
21
22
23
24
25
26
27
28
29
30
31
32
33
34
35
36
37
38
39
40
41
42
43
44
45
46
47
48
49
50
51
<?xml version="1.0" encoding="UTF-8"?>
<c3p0-config>
<!-- 默认配置,如果没有指定则使用这个配置 -->
<default-config>
<!-- 四项基本配置 -->
<property name="driverClass">com.mysql.jdbc.Driver</property>
<property name="jdbcUrl">jdbc:mysql://127.0.0.1:3306/day09_jdbc</property>
<property name="user">root</property>
<property name="password">123456</property>

<!-- 当连接池用完时客户端调用getConnection()后等待获取新连接的时间,超时后将抛出
SQLException,如设为0则无限期等待。单位毫秒。Default: 0 -->
<property name="checkoutTimeout">30000</property>

<!--隔多少秒检查连接池的空闲连接,0表示不检查-->
<property name="idleConnectionTestPeriod">30</property>

<!-- 初始化连接数 -->
<property name="initialPoolSize">10</property>

<!-- 连接的最大空闲时间,默认为0秒、不会关闭任何连接。设置30秒,30秒到期后,
连接若未使用就会被关闭 -->
<property name="maxIdleTime">30</property>

<!-- 池中最多的连接存放数目 -->
<property name="maxPoolSize">100</property>

<!-- 池中最少的连接存放数目 -->
<property name="minPoolSize">10</property>
<property name="maxStatements">200</property>
<user-overrides user="test-user">
<property name="maxPoolSize">10</property>
<property name="minPoolSize">1</property>
<property name="maxStatements">0</property>
</user-overrides>
</default-config>
<!-- 命名的配置 -->
<named-config name="offcn">
<property name="driverClass">com.mysql.jdbc.Driver</property>
<property name="jdbcUrl">jdbc:mysql://127.0.0.1:3306/day09_jdbc</property>
<property name="user">root</property>
<property name="password">123456</property>
<property name="acquireIncrement">5</property>
<property name="initialPoolSize">20</property>
<property name="minPoolSize">10</property>
<property name="maxPoolSize">40</property>
<property name="maxStatements">0</property>
<property name="maxStatementsPerConnection">5</property>
</named-config>
</c3p0-config>

测试类

1
2
3
4
5
6
7
8
9
10
11
12
13
14
15
16
17
18
19
public class DemoC3p0 {
public static void main(String[] args) throws Exception {
//创建数据源对象
ComboPooledDataSource dataSource = new ComboPooledDataSource();
//获取连接
Connection conn = dataSource.getConnection();
//System.out.println(conn);//com.mchange.v2.c3p0.impl.NewProxyConnection@224aed64
//执行sql进行预编译 不用createStatement是为了解决sql注入问题
PreparedStatement psvm = conn.prepareStatement("select * from product");
//执行
ResultSet rs = psvm.executeQuery();
while(rs.next()) {
int pid = rs.getInt("pid");
String pname = rs.getString("pname");
double price = rs.getDouble("price");
System.out.println(pid+pname+price);
}
}
}

也可以对其进行封装

1
2
3
4
5
6
7
8
9
10
11
12
13
14
15
16
17
18
19
20
21
public class C3p0Utils {
//创建数据源对象
private static DataSource dataSource = new ComboPooledDataSource();

//创建连接池 为了DBUtils工具提前准备
public static DataSource getDataSource() {
return dataSource;
}

//获取连接
public static Connection getConnection() {
try {
Connection conn = dataSource.getConnection();
return conn;
} catch (SQLException e) {
// TODO Auto-generated catch block
e.printStackTrace();
}
return null;
}
}

Druid连接池

  1. 导包 druid-1.0.9
  2. 倒入配置文件 放在src下面
    druid.properties
1
2
3
4
5
6
7
8
9
10
11
driverClassName=com.mysql.jdbc.Driver
url=jdbc:mysql://localhost:3306/jdbc
username=root
password=123456

# 初始化连接数
initialSize=5
#最大连接数
maxActive=10
#超时时间
maxWait=3000
  1. 写一个工具类对配置文件进行读取操作
1
2
3
4
5
6
7
8
9
10
11
12
13
14
15
16
17
18
19
20
21
22
23
24
25
26
public class DruidUtils {
private static DataSource dataSource;

//在静态代码块里面完成对数据源的初始化
static {
//拿到数据源对象
Properties properties = new Properties();
//获取配置文件
try {
FileInputStream inputStream = new FileInputStream("src/druid.properties");
//加载通过数据源进去
properties.load(inputStream);
//druid下面的方法
dataSource = DruidDataSourceFactory.createDataSource(properties);

} catch (Exception e) {
// TODO Auto-generated catch block
e.printStackTrace();
}
}

//获取数据源方法
public static DataSource getDataSource() {
return dataSource;
}
}
  1. 测试
    第一种:手动
1
2
3
4
5
6
7
8
9
10
11
12
13
14
15
16
17
18
public class TestDruid {
public static void main(String[] args) throws Exception {
/**
* 有了数据源之后
* 要么手动获取连接 就是 调用getConnection()的方法获取
* 要么就是创建QueryRunner时指定获取连接
*/
//增加
DataSource dataSource = DRUIDUtils.getDataSource();
Connection connection = dataSource.getConnection();
QueryRunner queryRunner = new QueryRunner();
int row = queryRunner.update(connection,"insert into user values(null,?,?,?)","都是","145","男");
System.out.println(row>0?"添加成功":"添加失败");
//释放资源
//因为不是手动创建的,而是调用的连接池里面的,所以释放资源是放回连接池当中,而不是销毁
org.apache.commons.dbutils.DbUtils.close(connection);
}
}

第二种:自动

1
2
3
4
5
6
7
8
9
10
11
12
13
14
public class TestDruid {
public static void main(String[] args) throws Exception {
/**
* 有了数据源之后
* 要么手动获取连接 就是 调用getConnection()的方法获取
* 要么就是创建QueryRunner时指定获取连接
*/
//第二种自动的
QueryRunner qr = new QueryRunner(DruidUtils.getDataSource());
String sql = "select * from product where pid = ?";
Product product = qr.query(sql, new BeanHandler<Product>(Product.class),2);
System.out.println(product);
}
}

总结:

使用Properties获取文件对象的时候
DBCP和Druid都需要读取配置文件,C3P0会自动读取配置文件(前提是放在src下),获取的时候用get方法获取就好
QueryRunner方法获取对象的时候
Druid,c3p0,DBCP都可创建实体类进行操作

DBCP连接池与C3P0连接池的区别:

  1. DBCP连接池使用效率高, 而C3P0效率相比较偏低;
  2. C3P0安全性较高, 而DBCP安全性偏低, 容易丢失连接;

需要的jar包

链接:https://pan.baidu.com/s/1_nqg99Fb83FA1KaFXsip_g
提取码:1314
复制这段内容后打开百度网盘手机App,操作更方便哦

-------------本文结束感谢您的阅读-------------