Spring整合Mybatis

Spring整合Mybatis

本文讲述Spring整合Mybatis ,先写一个Mybatis的案例,然后由Mybatis过渡到Spring的方式,并且测试事务是否整合成功
工具:idea

第一步:在pom.xml里面导入相应的依赖

1
2
3
4
5
6
7
8
9
10
11
12
13
14
15
16
17
18
19
20
21
22
23
24
25
26
27
28
29
30
31
32
33
34
35
36
37
38
39
40
41
42
43
44
45
46
47
48
49
50
51
52
53
54
55
56
57
58
59
60
61
62
63
64
65
66
67
68
69
70
71
72
73
74
75
76
<!--
spring-core spring-aop spring-context spring-jdbc spring-test
mybatis-***.jar
mysql.jar druid.jar
mybatis-spring.jar spring框架整合mybatis工具包
junit.jar 测试
-->
<dependencies>
<dependency>
<groupId>org.springframework</groupId>
<artifactId>spring-context</artifactId>
</dependency>

<dependency>
<groupId>org.springframework</groupId>
<artifactId>spring-test</artifactId>
<version>5.3.4</version>
</dependency>
<dependency>
<groupId>junit</groupId>
<artifactId>junit</artifactId>
<scope>test</scope>
</dependency>
<!-- 加入数据库驱动 -->
<dependency>
<groupId>mysql</groupId>
<artifactId>mysql-connector-java</artifactId>
<version>5.1.47</version>
</dependency>
<!-- 阿里数据源 -->
<dependency>
<groupId>com.alibaba</groupId>
<artifactId>druid</artifactId>
<version>1.1.15</version>
</dependency>

<dependency>
<groupId>org.projectlombok</groupId>
<artifactId>lombok</artifactId>
<version>1.18.18</version>
</dependency>

<!-- 切面的依赖 -->
<dependency>
<groupId>org.aspectj</groupId>
<artifactId>aspectjweaver</artifactId>
<version>1.9.5</version>
</dependency>

<!-- 整合jdbc 提供了事务管理工具类 -->
<dependency>
<groupId>org.springframework</groupId>
<artifactId>spring-jdbc</artifactId>
<version>5.3.4</version>
</dependency>

<!-- mybatis核心包 -->
<dependency>
<groupId>org.mybatis</groupId>
<artifactId>mybatis</artifactId>
<version>3.4.6</version>
</dependency>

<!-- spring整合mybatis工具包 -->
<dependency>
<groupId>org.mybatis</groupId>
<artifactId>mybatis-spring</artifactId>
<version>1.3.2</version>
</dependency>
<!-- 添加分页插件 -->
<dependency>
<groupId>com.github.pagehelper</groupId>
<artifactId>pagehelper</artifactId>
<version>5.1.10</version>
</dependency>
</dependencies>

第二步:新建数据库Account
在这里插入图片描述
在这里插入图片描述
第三步:创建Account实体类

1
2
3
4
5
6
7
8
9
10
11
12
13
14
15
16
17
18
19
20
21
22
23
24
25
26
27
28
29
30
31
32
33
34
35
36
37
38
39
40
41
42
43
44
45
46
47
48
49
50
51
52
53
54
55
56
57
package com.offcn.bean;

/**
* @Description
* @Author gaoyu
* @Version V1.0.0
* @Since 1.0
* @Date 2021/4/16
*/
public class Account {
private Integer aid;
private String aname;
private Double money;

public Account(Integer aid, String aname, Double money) {
this.aid = aid;
this.aname = aname;
this.money = money;
}

public Account() {
}

public Integer getAid() {
return aid;
}

public void setAid(Integer aid) {
this.aid = aid;
}

public String getAname() {
return aname;
}

public void setAname(String aname) {
this.aname = aname;
}

public Double getMoney() {
return money;
}

public void setMoney(Double money) {
this.money = money;
}

@Override
public String toString() {
return "Account{" +
"aid=" + aid +
", aname='" + aname + '\'' +
", money=" + money +
'}';
}
}

第四步:创建接口文件 AccountDao

1
2
3
4
5
6
7
8
9
10
11
12
13
14
15
package com.offcn.dao;

import com.offcn.bean.Account;

/**
* @Description
* @Author gaoyu
* @Version V1.0.0
* @Since 1.0
* @Date 2021/4/16
*/
public interface AccountDao {
public int saveInfo(Account account);
}

第五步:编写AccountMapper.xml文件,书写sql代码

1
2
3
4
5
6
7
8
9
10
11
12
<?xml version="1.0" encoding="UTF-8"?>
<!DOCTYPE mapper PUBLIC "-//mybatis.org//DTD Mapper 3.0//EN"
"http://mybatis.org/dtd/mybatis-3-mapper.dtd">
<!--动态代理-->
<mapper namespace="com.offcn.dao.AccountDao">

<!-- 增-->
<insert id="saveInfo">
insert into account(aid,aname,money) values(#{aid},#{aname},#{money})
</insert>

</mapper>

第六步:写mybatis的配置文件mybatis-config.xml

1
2
3
4
5
6
7
8
9
10
11
12
13
14
15
16
17
18
19
20
21
22
23
24
25
26
27
28
29
30
31
32
33
34
35
36
37
38
39
40
41
42
43
<?xml version="1.0" encoding="UTF-8" ?>
<!DOCTYPE configuration
PUBLIC "-//mybatis.org//DTD Config 3.0//EN"
"http://mybatis.org/dtd/mybatis-3-config.dtd">
<configuration>
<properties resource="db.properties"/>

<environments default="mysqlenvironment"><!-- 数据库-->
<!-- 和数据库交互的一种环境id当前环境的唯一标记-->
<environment id="mysqlenvironment"> <!--数据库-->
<!--
事务管理器
JDBC – 这个配置直接使用了 JDBC 的提交和回滚设施,它依赖从数据源获得的连接来管理事务作用域。
-->
<transactionManager type="JDBC"></transactionManager>
<!--
连接池
POOLED– 这种数据源的实现利用“池”的概念将 JDBC 连接对象组织起来,
避免了创建新的连接实例时所必需的初始化和认证时间。 这种处理方式很流行,能使并发 Web 应用快速响应请求。
-->
<dataSource type="POOLED">
<!--
数据库的链接条件配置
allowMultiQueries=true 当前的属性是mysql允许远程执行
多条sql语句并且每个语句的分割符是;
?allowMultiQueries=true 为了保证更新成功加的一句话
<property name="url" value="jdbc:mysql:///0113db?allowMultiQueries=true"/>
-->
<property name="driver" value="${jdbc.driverClassName}"/>
<property name="url" value="${jdbc.url}"/>
<property name="username" value="${jdbc.username}"/>
<property name="password" value="${jdbc.password}"/>
</dataSource>
</environment>
</environments>
<!--
加载我们的书写了sql配置文件
-->
<mappers>
<mapper resource="AccountMapper.xml"></mapper>
</mappers>
</configuration>

数据库连接配置文件db.properties

1
2
3
4
jdbc.driverClassName=com.mysql.jdbc.Driver
jdbc.url=jdbc:mysql:///mybatis?allowMultiQueries=true
jdbc.username=root
jdbc.password=123456

接着创建测试文件AccountTest

1
2
3
4
5
6
7
8
9
10
11
12
13
14
15
16
17
18
19
20
21
22
23
24
25
26
27
28
29
30
31
32
33
34
35
36
37
38
39
40
41
package com.offcn.test;

import com.offcn.bean.Account;
import com.offcn.dao.AccountDao;
import org.apache.ibatis.session.SqlSession;
import org.apache.ibatis.session.SqlSessionFactory;
import org.apache.ibatis.session.SqlSessionFactoryBuilder;
import org.junit.Test;

import org.apache.ibatis.io.Resources;
import java.io.InputStream;

/**
* @Description
* @Author gaoyu
* @Version V1.0.0
* @Since 1.0
* @Date 2021/4/16
*/
public class AccountTest {
@Test
public void test() throws Exception{
//使用MyBatis提供的工具完成配置文件的读取
String filePath = "mybatis-config.xml";
//读取配置文件 构建一个输入流
InputStream inputStream = Resources.getResourceAsStream(filePath);
//使用输入流对象构建mybatis框架的核心类 SqlSessionFactory对象
SqlSessionFactory sqlSessionFactory = new SqlSessionFactoryBuilder().build(inputStream);
//通过工厂生产解析器
SqlSession sqlSession = sqlSessionFactory.openSession();
//通过session获取的接口代理对象
AccountDao mapper = sqlSession.getMapper(AccountDao.class);
Account account = new Account(3, "小李", 233.0);
mapper.saveInfo(account);
//提交事务 非常重要 update delete insert 必须提交事务
sqlSession.commit();
sqlSession.close();

}
}

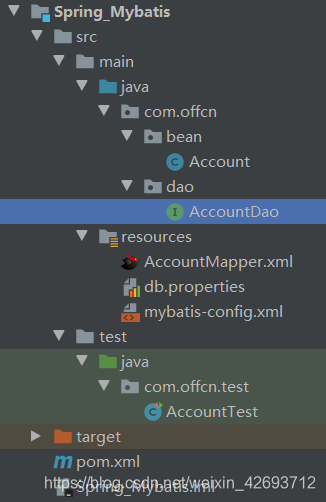
到此的目录结构为
在这里插入图片描述
这是Mybatis的做法,然后整合Spring

第一步:创建beans.xml文件,把mybatis-config.xml里面的内容进行整合

  • 读取db.properties配置文件
1
2
<!--读取db.properties配置文件-->
<context:property-placeholder location="classpath:db.properties"></context:property-placeholder>
  • 使用连接条件将文件加载到数据库(mybatis-config.xml的数据库连接条件配置文件就不用写了)
1
2
3
4
5
6
7
<!--    使用连接条件将文件加载到数据库-->
<bean name="ds" class="com.alibaba.druid.pool.DruidDataSource">
<property name="driverClassName" value="${jdbc.driverClassName}"></property>
<property name="url" value="${jdbc.url}"></property>
<property name="username" value="${jdbc.username}"></property>
<property name="password" value="${jdbc.password}"></property>
</bean>
  • 用数据源配置事务管理器(mybatis-config.xml的整个environment标签就不在用了)
1
2
3
4
5
<!--   事务管理配置-->
<bean name="manager" class="org.springframework.jdbc.datasource.DataSourceTransactionManager">
<property name="dataSource" ref="ds"></property>
</bean>
<tx:annotation-driven transaction-manager="manager"></tx:annotation-driven>
  • 管理Mybatis核心对象 sqlSessionFactory(因为要用mybatis-spring.jar里面的工具类)

管理myBatis核心对象sqlSessionfactory
这样test测试文件里面的配置就被整合到了这里,这个标签源码里面将他们进行了整合,都变成了一个个的属性,采用setter注入的方法
在把config里面的剩下的mapper拿过来,这样config里面就没有东西了
classPath表示类路径

1
2
3
4
5
6
7
8
<!--    
-->
<bean name="" class="org.mybatis.spring.SqlSessionFactoryBean">
<!-- 构建工厂必须使用数据源-->
<property name="dataSource" ref="ds"></property>
<!-- 加载AccountMapper.xml内容-->
<property name="mapperLocations" value="classpath:AccountMapper.xml"></property>
</bean>

到这里mybatis-config.xml这个文件就可以删除(当然也可以不删除,如果加载缓存在这个文件里面的话)
到这里整个beans.xml文件内容如下

1
2
3
4
5
6
7
8
9
10
11
12
13
14
15
16
17
18
19
20
21
22
23
24
25
26
27
28
29
30
31
32
33
34
35
36
37
38
39
40
41
42
43
<?xml version="1.0" encoding="UTF-8"?>
<beans xmlns="http://www.springframework.org/schema/beans"
xmlns:xsi="http://www.w3.org/2001/XMLSchema-instance"
xmlns:context="http://www.springframework.org/schema/context"
xmlns:aop="http://www.springframework.org/schema/aop"
xmlns:tx="http://www.springframework.org/schema/tx"
xsi:schemaLocation="http://www.springframework.org/schema/beans
http://www.springframework.org/schema/beans/spring-beans.xsd
http://www.springframework.org/schema/context
http://www.springframework.org/schema/context/spring-context.xsd
http://www.springframework.org/schema/aop
http://www.springframework.org/schema/aop/spring-aop.xsd
http://www.springframework.org/schema/tx
http://www.springframework.org/schema/tx/spring-tx.xsd">

<!--读取db.properties配置文件-->
<context:property-placeholder location="classpath:db.properties"></context:property-placeholder>
<!-- 使用连接条件将文件加载到数据库-->
<bean name="ds" class="com.alibaba.druid.pool.DruidDataSource">
<property name="driverClassName" value="${jdbc.driverClassName}"></property>
<property name="url" value="${jdbc.url}"></property>
<property name="username" value="${jdbc.username}"></property>
<property name="password" value="${jdbc.password}"></property>
</bean>

<!-- 事务管理配置-->
<bean name="manager" class="org.springframework.jdbc.datasource.DataSourceTransactionManager">
<property name="dataSource" ref="ds"></property>
</bean>
<tx:annotation-driven transaction-manager="manager"></tx:annotation-driven>

<!-- 管理myBatis核心对象sqlSessionfactory
这样test测试文件里面的配置就被整合到了这里,这个标签源码里面将他们进行了整合,都变成了一个个的属性,采用setter注入的方法
在把config里面的剩下的mapper拿过来,这样config里面就没有东西了
classPath表示类路径
-->
<bean name="" class="org.mybatis.spring.SqlSessionFactoryBean">
<!-- 构建工厂必须使用数据源-->
<property name="dataSource" ref="ds"></property>
<!-- 加载AccountMapper.xml内容-->
<property name="mapperLocations" value="classpath:AccountMapper.xml"></property>
</bean>
</beans>
  • 如果要加载mybatis的核心,比如二级缓存啊啥的,也可以加载进来
    在这里插入图片描述

  • 如果要加入分页插件的话先引入相关jar包,然后进行配置
    在这里插入图片描述
    在这里插入图片描述

  • 如果要想进行包扫描
    在这里插入图片描述
    还想加啥属性就是接着写property这个标签就好了

  • 生成接口代理对象 起点工厂 中间封装 最后代理对象
    接着新开一个bean标签 MapperScanner扫描 直接写class就行

1
2
3
4
5
6
7
8
9
</bean>
<!-- 生成接口代理对象MapperScannerConfigurer,mapper接口扫描配置 -->
<bean class="org.mybatis.spring.mapper.MapperScannerConfigurer">
<!-- 中间封装的 把上面的名字给下面的value-->
<!-- 接口位置-->
<property name="basePackage" value="com.offcn.dao"></property>
<!-- 工厂名字-->
<property name="sqlSessionFactoryBeanName" value="factoryBean"></property>
</bean>

下面这个value的值就是上面bean的name值
在这里插入图片描述
在这里插入图片描述

现在整个beans.xml的文件内容

1
2
3
4
5
6
7
8
9
10
11
12
13
14
15
16
17
18
19
20
21
22
23
24
25
26
27
28
29
30
31
32
33
34
35
36
37
38
39
40
41
42
43
44
45
46
47
48
49
50
51
52
53
54
55
56
57
58
59
60
61
62
63
<?xml version="1.0" encoding="UTF-8"?>
<beans xmlns="http://www.springframework.org/schema/beans"
xmlns:xsi="http://www.w3.org/2001/XMLSchema-instance"
xmlns:context="http://www.springframework.org/schema/context"
xmlns:aop="http://www.springframework.org/schema/aop"
xmlns:tx="http://www.springframework.org/schema/tx"
xsi:schemaLocation="http://www.springframework.org/schema/beans
http://www.springframework.org/schema/beans/spring-beans.xsd
http://www.springframework.org/schema/context
http://www.springframework.org/schema/context/spring-context.xsd
http://www.springframework.org/schema/aop
http://www.springframework.org/schema/aop/spring-aop.xsd
http://www.springframework.org/schema/tx
http://www.springframework.org/schema/tx/spring-tx.xsd">

<!--读取db.properties配置文件-->
<context:property-placeholder location="classpath:db.properties"></context:property-placeholder>
<!-- 使用连接条件将文件加载到数据库-->
<bean name="ds" class="com.alibaba.druid.pool.DruidDataSource">
<property name="driverClassName" value="${jdbc.driverClassName}"></property>
<property name="url" value="${jdbc.url}"></property>
<property name="username" value="${jdbc.username}"></property>
<property name="password" value="${jdbc.password}"></property>
</bean>

<!-- 事务管理配置-->
<bean name="manager" class="org.springframework.jdbc.datasource.DataSourceTransactionManager">
<property name="dataSource" ref="ds"></property>
</bean>
<tx:annotation-driven transaction-manager="manager"></tx:annotation-driven>

<!-- 管理myBatis核心对象sqlSessionfactory
这样test测试文件里面的配置就被整合到了这里,这个标签源码里面将他们进行了整合,都变成了一个个的属性,采用setter注入的方法
在把config里面的剩下的mapper拿过来,这样config里面就没有东西了
classPath表示类路径
-->
<bean name="factoryBean" class="org.mybatis.spring.SqlSessionFactoryBean">
<!-- 构建工厂必须使用数据源-->
<property name="dataSource" ref="ds"></property>
<!-- 加载AccountMapper.xml内容-->
<property name="mapperLocations" value="classpath:AccountMapper.xml"></property>
<!-- 加载mybatis二级缓存-->
<property name="configLocation" value="classpath:mybatis-config.xml"></property>
<!--分页插件-->
<property name="plugins">
<bean class="com.github.pagehelper.PageInterceptor"></bean>
</property>
<!-- 包扫描-->
<property name="typeAliasesPackage" value="com.offcn.bean"></property>


</bean>
<!-- 生成接口代理对象MapperScannerConfigurer,mapper接口扫描配置 -->
<bean class="org.mybatis.spring.mapper.MapperScannerConfigurer">
<!-- 中间封装的 把上面的名字给下面的value-->
<!-- 接口位置-->
<property name="basePackage" value="com.offcn.dao"></property>
<!-- 工厂名字-->
<property name="sqlSessionFactoryBeanName" value="factoryBean"></property>
</bean>


</beans>

进行测试:

1
2
3
4
5
6
7
8
9
10
11
12
13
14
15
16
17
18
19
20
21
22
23
24
25
26
27
package com.offcn.test;

import com.offcn.bean.Account;
import com.offcn.dao.AccountDao;
import org.junit.Test;
import org.springframework.context.support.ClassPathXmlApplicationContext;

/**
* @Description
* @Author gaoyu
* @Version V1.0.0
* @Since 1.0
* @Date 2021/4/16
*/
public class SpringMybatisTest {
@Test
public void test1(){
//实例化容器
ClassPathXmlApplicationContext context = new ClassPathXmlApplicationContext("beans.xml");
//从容器里面获取接口代理对象
AccountDao accountDao = (AccountDao) context.getBean("accountDao");
Account account = new Account(4, "王五", 56.3);
accountDao.saveInfo(account);

}
}

到现在的目录文件结构为
在这里插入图片描述

检查事务是否成功
创建对应的包
在这里插入图片描述
AccountService

1
2
3
4
5
6
7
8
9
10
11
12
13
14
15
package com.offcn.service;

import com.offcn.bean.Account;

/**
* @Description
* @Author gaoyu
* @Version V1.0.0
* @Since 1.0
* @Date 2021/4/16
*/
public interface AccountService {
public boolean saveInfo(Account account);
}

AccountServiceImpl

1
2
3
4
5
6
7
8
9
10
11
12
13
14
15
16
17
18
19
20
21
22
23
24
25
26
27
28
29
30
package com.offcn.service;

import com.offcn.bean.Account;
import com.offcn.dao.AccountDao;
import org.springframework.stereotype.Service;

import javax.annotation.Resource;

/**
* @Description
* @Author gaoyu
* @Version V1.0.0
* @Since 1.0
* @Date 2021/4/16
*/

@Service
public class AccountServiceImpl implements AccountService{

@Resource
private AccountDao accountDao;

@Transactional
public boolean saveInfo(Account account) {
int i = accountDao.saveInfo(account);
int a = 3/0;
return i>0;
}
}

如果想要用事务的话价格注解就可以
在这里插入图片描述

  • beans.xml里面扫描添加的注解工具类
    在这里插入图片描述
  • 最后进行测试
    在这里插入图片描述
    报错说明控制住了
    在这里插入图片描述

现在把错误放开检查是否成功
在AccountServiceImpl里面
在这里插入图片描述
在进行测试成功插入,事务控制成功
事务是加给Service的,不是加给dao的,所以注解要写在service里面

至此整合完毕,并且事务测试成功

-------------本文结束感谢您的阅读-------------